Wednesday, July 25, 2012

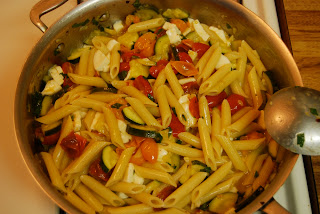
Zucchini and Cherry Tomatoes with Penne


                                                    “Hot town, Summer in the City,”


Zucchini and Cherry Tomatoes with Penne

This is a quick and easy pasta using a few fresh ingredients from the farmers market, one that doesn’t demand too much effort when it’s hot, but it beats take-out.  The vegetables simmer together and create the sauce that is ready in about the same time it takes the pasta to cook. While this uses penne, you could use your favorite variety of pasta. You could also use a different fresh herb.
You could also do this with eggplant. If you do, peel (or don’t peel) the eggplant and dice it into equal sized pieces. You’ll want 2 cups.  Eggplant soaks up a lot of oil when its cooked, so this method of precooking the eggplant in the oven* uses less oil. Place the diced eggplant into a bowl. Mix the eggplant with a few tablespoons oil, and season with salt and ground black pepper. Spread the eggplant out in one layer on a baking sheet lined with a sheet of parchment or a silicon mat (a non-stick pan will work, too). Roast the eggplant in a 350 degree oven until it begins to soften, about 10 minutes depending on the size of your eggplant pieces. If you make this with eggplant, start the sauce with the tomatoes then add the cooked eggplant to the tomatoes.

Zucchini and Cherry Tomatoes with Penne
For three servings:

4 ½ ounces dried pasta
2 cups zucchini, sliced lengthwise into quarters, then cut into 1/4” slices
2 cups assorted cherry tomatoes, cut in half, lengthwise
¼  cup chopped fresh basil
4 ounces fresh mozzarella, cut into cubes
1 or 2 teaspoon chopped garlic (depending on your vampire index)
hot pepper flakes, optional
salt and ground black pepper
olive oil for cooking
 ½ cup pasta water

1. Cook the pasta in boiling salted water according to package directions.
2. Heat a large sauté pen over medium-high heat. When the pan is hot, swirl in 2 to 3 tablespoons olive oil. Add the zucchini; season with some salt and pepper. Cook the zucchini for 3 to 4 minutes. Add the cherry tomatoes and the hot pepper flakes and stir; if the pan appears dry, add a little extra olive oil. Season the tomatoes with salt and pepper. Sauté the tomatoes for 2 to 3 minutes, then add the garlic and stir; cook until fragrant.  Add ½ cup of the pasta water to the pan. Reduce the heat to low, stir in the fresh basil, cover the pan and let the vegetables simmer gently until tender, about an additional 3 to 4 minutes; if the sauce is ready before the pasta, remove the pan from the heat. Remember, the vegetables are creating the sauce for the pasta, so don’t let the pan dry out.

3. Drain the pasta. Add the pasta to the vegetables; gloss the pasta with a little olive oil. Scatter the fresh mozzarella over the pasta and stir together. Divide the pasta between three bowls and serve.
*I know. “If it’s hot outside, who wants to turn on the oven?” but this is a good method for cooking eggplant without using so much oil.

Apricots: Apricot and Blackberry Pie


“The apricots lying in moss had the amber glow of sunset shining on dark-haired girls.”*

Stone Love: Apricots
Apricot and Blackberry Pie
Sometimes when you set out to get the ingredients for a particular recipe, you find yourself detoured. It only took one look at the fruit set out by the Stauffer family at the farmers’ market to know what pie to make. As eagerly as we await a peach pie, it wasn’t meant to be, at least this week. While there were white and yellow peaches, they were the cling variety so they came home for eating. We’ll have to wait for the easier to use freestone variety for a pie.
But there were apricots and blackberries. The apricots were already soft and ripe, so they went into the refrigerator along with the blackberries. 
Stone fruits such as apricots and peaches may need a little extra ripening when you bring them home. Place the unripe (hard) fruit on a plate and let it sit a room temperature. Check it daily to see if the fruit yields slightly to the touch, the sign that it’s ripe. Place the fruit into the refrigerator where it will remain ripe and ready but will not ripen any further.

You may need to adjust the sugar in your pie. Both the apricots and blackberries were perfectly sweet (one advantage to locally grown fruit) and they didn’t taste as if they need too much extra sweetening.

Since I have included instructions for rolling a crust in previous pie recipes, I have omitted them here. You can always reference one of those recipes. Pie dough and crumb topping recipes are also available in other recipes.

Apricot and Blackberry Crumb Pie
For one 9” pie

1 recipe pie dough for a 9” pie
1 recipe crumb topping
1 pint apricots (2 cups pitted apricots)
1 pint blackberries (2 cups)
¼ cup sugar
2 Tablespoons cornstarch

1. Rinse the fruits separately. Remove and discard the pits from the apricots. If the apricots are large, you can cut the apricots into quarters. Place the apricots into a bowl. Add the blackberries. Add the sugar to the fruit, stir, and let stand for 30 minutes to release some of their juices.

2. Preheat oven to 450 degrees. Add the cornstarch to the bowl of fruit and gently stir until the cornstarch is dissolved. Remove the prepared pie shell from the refrigerator. Spread the fruit and their juices evenly into the pie shell. Cover with the crumb topping. Place the pie on a baking pan. Place the pie into the oven and bake for 10 minutes, then reduce the heat to 350 degrees and bake for an additional 45 to 50 minutes until the fruit is bubbling and the crumb topping is nicely browned. Remove from oven and let cool. Some detours are well worth it.


* from The Belly of Paris by Emile Zola (translation by Mark Kurlansky)

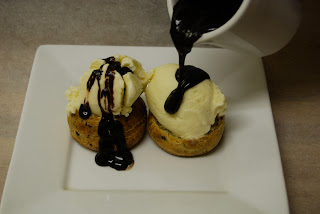
Profiteroles au chocolat


It is with good reason why these little desserts are so often referred to as “profit-roles” in a restaurant; the “food cost” (i.e. the price of ingredients) is so low compared to the money you make from them (i.e. the profits).
Made from classic French pate a choux, they are the basis of many classic desserts (cream puffs and éclairs, Paris Brest, and the popular bistro dessert, profiteroles au chocolat). If  you omit the sugar and add some cheese  they make a great hot hors d’oeuvre, gougeres. It is also used for gnocchi a la parisienne. It’s a good dough to know.

I once worked with a chef who received his formal French training on the job at a restaurant in St. Helena, Calif. When I worked with him, he gave me his recipe which is pretty much the classic pate a choux dough recipe (they are all pretty much identical). He said he used to make the profiteroles for the restaurant everyday for 9 months. When I use the recipe I am reminded of the years we spent together.*

The flour is given as a weight, which was how he passed the recipe down to me. A typical pate a choux recipe will use equal amounts milk (or water) to flour. This has a little more. If you don’t have a scale, 5 ounces is about 1 cup and 3 tablespoons of flour.

For this particular take on the classic, I folded some crushed Oreo cookies into the completed choux paste, but you don’t have to. One day at work while I was crushing the Oreos with a hammer, someone walked by, stopped and seeing what I was doing said, “That looks like the way my mom must have packed my lunch for school. Or at least that’s how my cookies always ended up.”

I pipe the puffs with a pastry bag fitted with a ¾” wide tube tip. You could use a “zip-lock” type plastic bag or you could drop the pate a choux onto the baking tray with spoons. Since pate a choux is so sticky, spray the spoons with non-stick cooking spray.
Baked profiteroles can be frozen then thawed for future use. You can also warm the thawed profiteroles in a low oven to re-crisp them.

Pate a Choux
Makes 20 individual puffs, about 2” each

1 cup milk
4 Tablespoons unsalted butter                                                       
½ teaspoon salt
2 Tablespoons sugar
5 ounces all-purpose flour (approx. 1 cup plus 3 Tablespoons)
4 eggs
3 Oreo cookies, crushed (optional)
1 egg beaten, for egg wash

1. Heat oven to 425 degrees.  Pour the milk into a medium-sized saucepan. Add the butter, salt and sugar and stir together. Place the pan over medium high heat. When the butter has melted and the mixture is boiling, add the flour and stir with a wooden until the mixture comes together and forms a ball of dough (this is called a panade). Continue stirring over the heat until a floury film coats the bottom and sides of the pan. Remove pan from heat and let cool slightly.
2. Place the choux dough into the bowl of a stand mixer fitted with the paddle attachment. Turn the mixer on low/medium speed. Add the eggs, one at a time, adding the next egg only when the previous egg is completely incorporated into the dough. At first, the dough will “fall apart” but it will blend together as each egg is absorbed. Scrape down the sides of the bowl and mix until all of the eggs are incorporated and the choux dough is smooth. Fold in the crushed Oreos, if using.

3. Line a baking sheet with either a silicon mat or sheet of parchment paper. Pipe the pate a choux onto the tray, about 1” apart. Brush each puff with the egg wash. Place the tray into the oven and bake for 20 minutes. Lower the temperature to 350 after 20 minutes, rotate the baking sheet and continue baking the profiteroles for 25 to 30 minutes until browned. Remove the tray from the oven and let cool.


4. To serve, slice off the top of the profiterole and fill with a small scoop of vanilla ice cream. (I will get around to the ice cream post). Drizzle with warm chocolate sauce, recipe below:

Chocolate Sauce:
¼ cup heavy cream
¼ cup milk
¼ cup light corn syrup
2 Tablespoons vegetable oil
8 ounces chocolate (semisweet or bittersweet), chopped
1. Place the cream, milk, corn syrup, and oil into a small saucepan. Place the pan over medium-high heat until the mixture approaches the boil. Remove from heat, add the chocolate and whisk until smooth. The chocolate sauce can be made ahead of time, kept in the refrigerator and reheated as needed.


*He was working at the restaurant (La Belle Helene) when my wife, youngest daughter, and I visited Napa years ago. We dined (almost) next door at Miramonte. He told me later when we worked together and found out about this remarkable coincidence that the kitchen staff from both restaurants used to hang out after hours. Small world.  

Fritters!


                                   “I say your young men’ll be frittern!
                          Frittern away their noontime, suppertime, choretime, too.”

Fritters!
Fritters are another way in which we prepared corn off the cob for our daughters. They can be made with just about anything. This recipe is for zucchini and corn fritters, but can be made with just one vegetable. You can also make them with fresh fruit by adding a little sugar to the batter mixture. And who doesn’t like something fried?
Unlike deep-fried fritters, there are cooked  using  a small amount of oil, more in the style of a pancake.

Corn and Zucchini Fritters
Makes about sixteen 2 ½ “ fritters                                              
2 ears corn
1 medium zucchini
¼ cup diced onion
2 or 3 Tablespoons chopped fresh basil
salt and ground black pepper

Batter:
½ cup all-purpose flour
½ teaspoon baking powder
  Tablespoon sugar, for fruit fritters)
½ cup cold club soda

1. Husk the corn. Cut the kernels from the ears. This is best done by standing the corn in a bowl and cutting the kernels off into the bowl. Place the corn kernels into a small saucepan and fill the pan with enough water to just cover the corn. Cook the corn for 1 minute; drain the corn into a colander and refresh under cold water. Set aside.
2. Grate the zucchini into a bowl; this will be about 2 cups grated zucchini. Add the onion, the cooled corn, and the basil: season with salt and pepper.
3. In a second bowl, mix the flour, baking powder and salt. Pour in the club soda and whisk until smooth. Pour the batter into the bowl of vegetables and mix to combine. This will make enough batter to coat all of the vegetables.
4. Heat a non-stick sauté pan over medium-high heat. When the pan is hot, swirl in 2 to 3 tablespoons vegetable oil. Take a heaping tablespoon of the batter and add it to the pan, pressing the batter to flatten it. Fill the pan with just enough fritters to fill the pan. When the fritters are browned on the bottom, turn them over and cook until browned on the second side. Transfer the cooked fritters to a wire rack on top of a baking sheet. Repeat until all of the fritters have been cooked. Keep the fritters warm in a low oven until ready to serve.


From “Ya Got Trouble,” The Music Man, lyrics by Meredith Wilson

Rosemary, part two


Rosemary Smoked Grilled Swordfish with Orange  & Black Olive Relish
(Listening: Chick Corea: Piano Improvisations, Vol 1)

With the abundance of rosemary in our possession, I put this meal together, choosing to use some rosemary branches to smoke the swordfish as it grilled. Wanting to keep it light for the hot weather, I thought of a citrus relish for the fish. At first I thought of a preserved lemon relish but remembered I hadn’t bothered to post that recipe so I decided on one based on oranges instead.

You can of course use any woody fresh herb for smoking (thyme, oregano, marjoram, fennel branches, etc.).
Youngest daughter, not a fan of fish, had chicken, which is another alternative.

Grilled Swordfish with Orange & Black Olive Relish
The relish recipe makes enough for 3 to 4 servings
For two servings:

Two  4 to 6 ounce portions of swordfish
One navel orange
¼ red onion, thinly sliced
12 to 15 oil cured olives, pitted*
1 Tablespoon Balsamic Vinegar
3 Tablespoons Extra virgin olive oil
Salt and ground black pepper
Fresh rosemary branches

1. Begin by grating the zest of the orange into a bowl. Cut the top and bottom off the orange. Place the cut surface of the orange onto a cutting board. Cut down around the orange exposing the segments. Continue around until all of the skin and white pith has been removed. Working over the bowl, use a paring knife to cut the segments from the orange. Slice the orange segments in half. Squeeze any remaining juice from the remaining orange membrane into the bowl. Add the pitted olives and sliced onion to the bowl. Add the vinegar, oil, salt and pepper and stir to combine. Cover and set the relish aside.
2. Build a charcoal fire in a grill. When the coals are hot, spread the coals evenly onto the bottom of the grill. Rub the grill grate with vegetable oil. Scatter the rosemary branches over the hot coals. Place the fish on the grill. Cover the grill and let the rosemary smoke the swordfish as it grills, about 5 minutes per side for 1” thick swordfish steaks for well done, less time for medium. Because of the short cooking time, use plenty of rosemary to infuse the smoke flavor into the fish; add additional branches as needed. Remove fish from grill and serve topped with the orange relish.


*If the olives aren’t pitted, place the olives on a cutting board and press them individually with the bottom of a glass. This will crack the olive making it easy to remove the pits.

We Can Pickle That!


Dill Style Refrigerator Pickles

We can pickle that!*


Youngest daughter and I set about making some dill style pickles, with Kirby cucumbers, zucchini and, for oldest daughter’s southern beau, okra. The brine was the same for each vegetable. We only made some small alterations. Making pickles is easy. You can make small batches, try them out, and correct or improve them to your taste. You can pretty much pickle anything, within reason. Don’t get carried away and use the high heel from a shoe or a parking ticket.
These are refrigerator pickles which means that after the pickles are made, they sit and cure in the refrigerator; no canning necessary.
For traditional pickles, use Kirby cucumbers. We used about 10 cucumbers for two quart jars of pickles. Slice the cucumbers in half lengthwise, and depending on their size and cut each piece in half again lengthwise.
The zucchini may need to cut to fit the height of the jar. Two medium-sized zucchini should make one quart jar of zucchini pickles. Cut the zucchini in quarters or eighths, lengthwise, depending on the size of the zucchini.
For pickled okra, we kept the okra whole. Our dozen okra pods weren’t enough to fill the jar; I picked them up on an impulse at a farmers’ market. Next time, I’ll know better.

For dill pickles, add 1 teaspoon dill seeds to each jar of pickles. You can also add 1 or 2 cloves of garlic and some hot pepper flakes or a  slice or two of a hot pepper.
For the zucchini, we used 1 teaspoon pickling spice instead of the dill seed. We also put several springs of fresh basil in the jar with the zucchini slices and a sliced clove of garlic.
For the okra, we passed on the hot pepper (he’s not a fan of spicy) and made them in the style of a dill pickle using dill seed and some garlic.


Basic Dill Pickle Style brine:
2 cups water
1 cup white vinegar
1 ½  Tablespoons salt

1. Wash and dry the jars; we used quart-sized jars. Wash and dry the vegetables, trimming them as needed to fit the jars. Pack the jars tightly with the vegetables; add  seasonings (dill seeds, pickling spice, garlic, hot pepper flakes) to the jar.
2. Place the water, vinegar, and salt into a saucepan. Stir and bring the brine to a boil. Ladle the hot brine into the jars, filling the jar up to within an inch of the top. Screw on the lids and let cool. Refrigerate the pickles for at least a week and enjoy.

Next time: Bread and Butter style pickling.

*Thank you, Fred Armisen and Carrie Brownstein. Portlandia  Season 2 Episode 1
                            http://www.youtube.com/watch?v=yYey8ntlK_E

Rosemary, part one


         “There’s rosemary, that’s for remembrance. Pray you love, remember.”*


Rosemary
Rosemary Skewered Lamb and Apricot Kebobs

On one of our recent “pie nights” our good friends and partners in gustatory delight (a.k.a. the Eminent  Botanist and his wife, the Equally Eminent Mosaicist) gifted us with a large offering of rosemary from their garden. Now while this may have been an attempt at thinning their rosemary, we still welcomed the gift for it provided the inspiration for several meals.
The rosemary was long enough to make 10” skewers of rosemary. Leave about 1” of the rosemary intact at the top of the branch and remove the rest of the rosemary from the branch. Save this "discarded" rosemary in a plastic bag in the refrigerator for another use. Many grocery stores have bunches of rosemary branches suitable to use for grilling if you don’t have your own (or have a friend who does). You can also use bamboo or metal skewers.
I had some boneless leg of lamb (you could also do this with pork) and I cut it into cubes and marinated it.  Drain and pat the lamb dry with paper towels before making the kebobs. When I assembled the skewers I made a “pilot hole” in the meat with a sturdier skewer so as not to break the rosemary skewers. Alternately thread an apricot half in between a couple pieces of lamb onto the rosemary skewer.


Lamb and Apricot Kebobs
For 3 servings:
1 pound lamb, cut into 1” cubes
6 apricots, pits removed and halved, lengthwise

Marinade:
¼ cup red wine
¼ cup olive oil
1 Tablespoon chopped garlic
1 Tablespoon chopped rosemary
¼ teaspoon salt
¼ teaspoon ground black pepper

1. Place all of the marinade ingredients into a bowl and whisk until combined. Add the lamb cubes and let lamb marinate for at least an hour. For longer marinating, cover the bowl with plastic wrap and refrigerate.

2. Remove the lamb from the marinade and blot dry on paper towels. Alternate skewering the lamb with the apricot halves (use four halves per skewer). Set aside.

3. Season the kebobs with salt and ground black pepper. Drizzle each kebob with a little olive oil. Grill the kebobs outside over a hot charcoal fire on or the stove on a grill pan for about 2 minutes per side for rare or slightly longer depending on desired degree of doneness. Remove kebobs from the grill to a plate and let rest for 2 or 3 minutes before serving. Serve the kebobs with some couscous mixed with a couple of your favorite vegetables.


                       “Good night, ladies, good night, sweet ladies, good night, good night.”*

Hamlet, Wm. Shakespeare. Act 4, Scene V.

Sunday, July 8, 2012

Corn Off the Cob: Sauteed Corn with Tasso


                                                                        “Su, Se, sh2”

Sauteed Corn with Tasso


When our daughters were younger and had braces (their “metal munching moon mice” phase), there were foods that they weren’t allowed to have, chief among them was corn on the cob. It was simple enough. We just cut the corn off the cob for them, with my wife and I joining in. So began the corn off the cob years and the recipes it inspired. Today, they still prefer to remove the corn from the cob.

Our first local corn arrived at the farmers market. Those who live further south have been enjoying their local corn while we waited. Yes, fresh corn on the cob was available in the store but it’s not the same thing.

There was a time when the time lag between when corn was picked and when it was eaten meant that the corn tasted more starchy than sweet. Corn used to lose its sweetness within 24 hours of picking. Not so much anymore. The corn shipped to your store had been hybridized to stay sweeter, longer. This is not necessarily a bad thing. Hybridization has been going on for years, a process of breeding and cross-pollinating corn plants for the desired outcome. There is even shorthand for these different varieties. “Su” is short for “sugary,” the oldest variety of sweet corn, from the 1820’s. “Se,” which is “sugar enhanced,” was the first variety to have the desired property of staying sweet longer before turning starchy. Finally, there is the “sh2,” a variety in which the corn is both sweet and stays sweet the longest. All of this interest in sweetness became increasingly popular among farmers in the 1980’s as more corn was grown in Florida.

Corn color preference varies from region to region. White is most preferred here in the mid-Atlantic to the South. Bicolor corn, the result of cross-pollination, is preferred in the Northeast. Yellow corn is the favorite elsewhere. These preferences usually have to do with varieties that were regionally available but rarely are now. Remember “Silver Queen” corn?

This recipe is a new addition to the corn-off-the-cob collection. Tasso is a Southern Louisiana spicy, smoked pork product usually hard to find around here. While thought of as a “ham,” it is made from the shoulder. I found some locally made tasso at the Skippack Farmers Market, a small outdoor market that sits on the western end of the village of Skippack, Pa. (Sundays from 10AM until 1PM).  Freeland Market, who had the tasso, is a recent addition to the Skippack market; they are also at the Pottstown Farmers Market on Saturdays. They offer a variety of smoked and non-smoked meat products. I picked up the tasso in anticipation of fresh local corn.

If you can’t find tasso, you could substitute with some diced andouille sausage, which is made locally by Leidy’s Meats. Either adds a smoky/spicy flavor to the dish.

Sauteed Corn with Tasso
This recipe made three servings but its simple to increase to serve more people.

3 ears of corn
¼ cup diced tasso
½ cup diced red bell pepper
½ cup diced onion
salt and ground black pepper
olive oil and water for cooking

1. Husk the corn. Cut the corn off the cobs; this is made easier if you stand the ear of corn upright in a bowl and cut down from the top of the ear of corn. The falling kernels will stay in the bowl. Set aside.
2. Heat a large sauté pan over medium-high heat. When the pan is hot, swirl in two tablespoons olive oil. Add the diced tasso.  Cook the tasso for 2 to 3 minutes, adjusting the heat as needed, letting the tasso brown slightly. Add the onion and bell pepper and stir. Lower the heat to medium and continue cooking the tasso and vegetables for another 3 to 4 minutes. If the peppers and the onion begin to color, this is alright. Add the corn kernels and stir everything together; season with salt and ground black pepper. If the pan appears dry, add some additional olive oil. Corn off the cob has a tendency to stick to the bottom of the pan as it cooks, so stir frequently. Pour ½ cup water into the pan, stir and reduce the heat. Simmer the mixture for another 4 to 5 minutes, until the corn is tender.


Sour Cherry Pie


                                    “Montmorency cherries like the chubby lips of fat women;”*

Cherry Pie
(Listening: Frank Kimbrough: "Play"


Years ago when our oldest daughter was still small enough to fit into a Snuggli,  my wife and I would pick the cherries from our friend’s sour cherry tree. Pitting the cherries was a bit of a chore but after that task was completed, we could pull a bag from the freezer and bake a cherry pie long after the season was just a memory.
Sadly, that tree no longer exists so I had to do my cherry picking at Stauffer Family Farm, at the Skippack Farmer’s Market. I picked up a cherry pitter at a kitchen supply store when it was marked down so pitting cherries has gotten much easier over the years.

Cherry pies can be problematic because you never know exactly how much juice is going to be given off by the cherries. If you use cherries that you have frozen and thawed, you will probably end up discarding the juice given up by the cherries when they thaw but there will still be more. Some recipes call for cooking the filling first to make sure that the filling thickens properly. Then, it’s a simple matter of filling a partially baked pie or tart shell with the filling, covering with a crumb top, and baking it until the crumb is brown. If you do it this way remember, a warm filling goes into a warm pie shell.

Tonight will be another pie night with friends; we had to take a week off since they were away attending the Rochester Jazz Festival. We placated ourselves with another black raspberry/blueberry pie and jazz from an assortment of CD’s. Cherry pie is not a favorite of our youngest daughter, but I have a surprise for her in the freezer.


Sour Cherry Pie
For one 9” pie
You will need a double recipe of pie dough, if making a top crust pie

4 cups pitted sour cherries
¾ cup sugar
3 Tablespoons cornstarch

1. Place the cherries into a bowl; add the sugar, cornstarch and stir. Set bowl aside.

2. On a lightly floured surface, roll out the pie dough to 1/8th inch thickness and fit it into the pie pan. If using a crumb topping, trim the edges of the dough and crimp the dough around the outer edge of the pie. Refrigerate the pie shell for 10 to 15 minutes.

3. Heat oven to 450 degrees. If using a top crust, remove the dough from the refrigerator and roll it out on a lightly floured surface so it is ready to use. Remove pie shell from the refrigerator. Stir the cherries again and pour the cherries and their juices into the pie shell. Top with the second piece of dough, sealing the edges and crimping the dough around the outer edge of the pie. (A lattice top is nice on a cherry pie, too.) Place the pie onto a baking pan and put the pie into the oven. Bake for 10 minutes at 450 degrees, then lower the oven and bake for an additional 50 to 60 minutes, until the filling is bubbling and the crust is golden. Remove from the oven and let cool before serving.


* from The Belly of Paris by Emile Zola,  (translation by Mark Kurlansky)


                                                     http://home.earthlink.net/~fkimbrough/


Frank Kimbrough's pianism is constantly lyrical, even in this 2005 outing which is musically influenced by two of his earliest mentors, the pianists Paul Bley and Andrew Hill, both of whom sit just outside of the jazz mainstream. The late Paul Motian is superb throughout, but then again, he did write the book on drumming in a piano trio. Play is aptly named. A few takes, no rehearsals, everyone in the same room, no headphones, total communication.
Here is a link to Kimbrough playing solo at New York's Rubin Museum:
                               http://www.youtube.com/watch?v=WGGBmsR7L4g

Summer Vegetable Ragout


“I’d like to sup, with my baby tonight
Refill the cup with my baby tonight
                                But I ain’t up to my baby tonight,
                                ‘Cause it’s too darn hot.”*


Summer Vegetable Ragout


Summer Vegetable Ragout with Striped Bass


Certain words fall into favor when describing food. For instance, the word “roast”  (or “roasted”) made a big comeback over the years (replacing the blander descriptive, “baked”) because it conveys the deep, caramelized flavors you achieve at a higher temperature. (Curiously, the oven temperature for roast chicken in Fannie Farmer is a mere 325 degrees, less than the temperature for baking a cake). Ragout is one of those words, too. On a menu or in a recipe the word evokes something a bit more than the word “stew” does, but they are essentially the same thing.

While certain vegetables are used in this recipe, you can substitute other combinations as they become seasonally available. Select a few vegetables, an herb or two and cook them with care. The juices of the vegetables blend with the cooking water to make a flavorful broth. Just remember to simmer the vegetables long enough to be tender, but not mushy.  It’s a simple technique that captures the vibrant flavors of the summer, just the style of no-brainer cooking you need when it’s too darn hot.

Fish, beef, pork, and chicken all pair well with a ragout like this. Paired with a starch (quinoa, Israeli couscous, faro, rice, etc) the ragout can be a meal in itself.

Summer Vegetable Ragout:
For three servings**

3 ears of corn
1 cup green beans, sliced into ½” pieces
1/3 cup peas
10 to 12 cherry tomatoes, halved
½ cup chopped onion
1 teaspoon minced garlic
¼ cup fresh basil leaves
salt and ground black pepper
olive oil and water, for cooking
2 Tablespoons unsalted butter, optional

1. Husk the corn. Cut the kernels off the cob and set aside.
2. Place a large sauté pan over medium heat. When the pan is hot, swirl in 2 tablespoons olive oil. Add the onion and sweat the onions for 2 to 3 minutes. Add the garlic and cook until fragrant, about 30 seconds. Add the remaining vegetables; season with salt and pepper. Add about ½ cup water to the pan. Shred the basil leaves and stir them into the vegetables. Cover the pan, reduce the heat to low and continue cooking for 10 to 12 minutes, until the vegetables are tender. Before serving the ragout, Swirl in an additional tablespoon of olive oil and the butter into the ragout before serving.
Summer Vegetable Ragout with Grilled Chicken

* Too Darn Hot, words and music Cole Porter
** sorry that these recipes are centered around three servings but that’s the number I’m feeding right now.
***anymore footnotes and this will start looking like something by David Foster Wallace.


Figs!


                    “..each man under his own vine and Fig tree." *


 Prosciutto Wrapped Figs with Gorgonzola

Our local fig season is brief. This isn’t fig territory, despite the yearly efforts from  Paul Tsakos of Overbrook Herb Farm who every season brings young fig trees to our farmers' market. Some local figs do appear at the Fair Food Farm stand in the Reading Terminal Market.
 If you wander some Philadelphia neighborhoods, you might spot a fig tree. I remember one fig tree with its limbs of fruit reaching over its yard on N. 22nd Street. Because of the cold winters, I have seen fig trees around my hometown sheltered under sheaths of plastic.
For fresh figs, we usually have to rely on the store, most often Whole Foods.
Figs are an ancient fruit; their history goes back millennia. Long considered a sacred fruit, it appears in myth and Holy Scriptures. Adam and Eve, you will recall, covered their nakedness with fig leaves when they were banished from Eden. (Was the fig the forbidden fruit? Who knows but chances are it wasn’t the apple, either.)
Buddha attained enlightenment while meditating under a fig tree. In the myths of ancient Rome, Romulus and Remus were said to have rested under a fig tree. There are also references to figs in the Qu’ran and in both the Illiad and the Odyssey, to name but a few. Interesting how wide spread the fig’s story is.
Figs are available dried year round but we wait for fresh fig season. This is a favorite recipe, not so much a recipe but instructions. You can forgo the prosciutto if you avoid that type of thing, but by all means, use imported gorgonzola cheese. It may cost a little extra, but it is worth it.

Prosciutto Wrapped Figs Stuffed with Gorgonzola

One container fresh figs (about 6 to 8)
3 to 4 slices prosciutto
Gorgonzola cheese
Olive oil

1. Heat oven to 375 degrees. Trim the stems from the figs. Slice each fig in half, lengthwise about 2/3rds of the way down. Place about a teaspoon of gorgonzola into the fig. Slice the prosciutto in half, lengthwise. Use a halved slice of prosciutto to wrap each fig. Place the figs into a small baking dish. Drizzle with about 2 tablespoons olive oil. Bake the figs for 12 to 15 minutes, until the cheese has melted. Remove from the oven and serve. Simple, no?


* 1 Kings 4:25

Farmers' Market Potato and Green Bean Salad


Farmers’ Market Potato and Green Bean Salad


This recipe was put together using a few things from this week’s trip to our Farmers Market. Simple to do, the most “work” is caramelizing the onions, which takes about 30 minutes of slow cooking but it works well with the salad.  Our youngest daughter even was even heard to say, “Nice touch with the caramelized onions, Dad.”
(She was seen snacking on it the next day). You can adjust the salad dressing before serving. If you like more of a “bite” from vinegar, just add more. The potatoes and green beans will need addition seasoning of salt; it’s what happens with cooled vegetables. Taste as you go.

New Potato and Green Bean Salad:
makes about six servings

½  pound new potatoes
35 to 40 green beans (string beans)
1 ½ cups sliced onion
about ¼ to 1/3 cup fresh basil leaves
salt and olive oil, for cooking

the salad dressing:
1 Tablespoon grainy Dijon mustard
2 Tablespoons red wine vinegar
5 Tablespoons extra virgin olive oil
salt and freshly ground black pepper

1. Begin by caramelizing the onions. Place a medium-sized sauté pan over high heat. When hot, swirl in 2 tablespoons olive oil. Add the onions; stir as they cook. As they begin to soft, season with some salt; lower the heat and continue cooking. Stir from time to time, adjusting the heat to prevent the onions from burning. Cook until the onions are evenly brown and caramelized. This will take 25 to 30 minutes, but if the heat is low, it shouldn’t need constant monitoring. When the onions are caramelized, drain them onto some paper towels and set aside.

2. Wash the potatoes under cold water. Cut the potatoes into equal sized pieces. Place the potatoes into a medium-sized saucepan and cover them with cold water, about 1” above the potatoes. Lightly salt the water and place the potatoes over high heat. When the potatoes come to a boil, slightly reduce the heat and simmer until the potatoes are tender, about 5 to 7 minutes depending on their size. A knife point inserted into the potato should easily pierce the potato. Drain the potatoes, spread them out onto a tray and let them cool.

3. Pick off the stem ends of the beans. To cook the beans, fill a medium-sized pan with about 1 cup cold water. Lightly salt the water. Place the pan over high heat; when the water comes to a boil, add the green beans and cook until crisp/tender, about 5 minutes: taste and test for doneness. Drain the beans into a colander and refresh them under cold water until cool. Refrigerate the beans until needed.

3. Mix the salad dressing in a medium-sized bowl. Add the mustard and the vinegar and whisk together. Whisk in the olive oil; season with salt and pepper. Set bowl aside.

4. When the potatoes are cool, add them to the bowl and mix them in the dressing. Taste the potatoes and season with additional salt, if needed. Assemble the salad just before serving. Add the green beans, caramelized onions, and shred the basil leaves over the salad. Mix well; taste and adjust the seasoning as needed. Gloss the salad with a drizzle of olive oil and serve.