Tuesday, September 1, 2015

Late Summer Succotash


(What's that crab doing sitting among those vegetables? You'll see.)


            “Some days in late August at home are like this, the air thin and eager like this, with
                                 something in it sad and nostalgic, and familiar.”
                             - from The Sound and The Fury by William Faulkner

Summer is winding down. The light at dusk changes, more yellow reflecting on the leaves. Autumn arrives in a few weeks.
If you are a farmer’s market shopper like me, you will find all you need to make a succotash, whether it’s exactly like this one or not. It’s open to personal interpretation and preferences.
Succotash is the familiar vegetable dish that comes to us from the Native Americans. Variations of it appear across the country. I grew up with it made with lima beans. No thank you. 
The basics are corn and beans, but it becomes more interesting with the addition of other seasonal offerings, such as squash, bell pepper, or sweet cherry tomatoes. I found fresh cranberry beans but any bean will work, even green beans or wax beans. It’s the spirit of the dish that’s important.
I made this one night as a base for soft shell crabs (for me) and salmon for my red haired food co-pilot. It pairs with anything.
A fresh shell bean, such as a cranberry bean, needs time to cook, about 20 to 30 minutes depending on the size of the beans you find inside the pod. If you use a shelling bean, they can cook while you put the succotash together, then when the beans are ready, drain them and add stir them into the succotash. A fresh green bean or wax bean just needs to be sliced and cooked with the other vegetables until tender. Add the corn last since it requires the least amount of cooking time.
It’s easy.

Late Summer Succotash
for two servings
¼ pound cranberry beans (1/2 cup beans when shelled)
2 ears corn
½ cup diced onion
¼ cup diced red bell pepper
1 or 2 cloves garlic, minced
10 to 12 cherry tomatoes, halved
2 Tablespoons fresh basil, torn
salt and freshly ground black pepper
olive oil, for cooking
1 Tablespoon unsalted butter, optional

1. If you are using a fresh shelling bean, remove them from their pods and set aside.  Fill a medium-sized saucepan with about 2 cups of water, place it onto the stove, and bring it to a boil. When the water is boiling, add the beans and cook until tender, about 20 to 30 minutes.
2. Husk the corn. Cut the kernels from the cobs. The easiest way to do this is to stand the corn upright in a bowl  and slice down the length of the cob to cut the kernels from the cob. The falling corn will stay in the bowl. Set the corn aside.
3. Place a large sauté pan over medium-high heat. When the pan is hot, swirl in about 2 tablespoons olive oil. Add the onions and bell pepper to the pan and cook for about 2 minutes until the onions become translucent. Add the garlic and cook until fragrant, about 30 seconds. Add the cherry tomatoes and season lightly with salt and ground black pepper. Cook for about 4 minutes to soften the tomatoes. Add additional olive oil as needed if the pan appears dry. (If you are using a fresh green or wax bean, add them now along with ½ cup of water to help cook the beans). If you are using a shelling bean and they’re still cooking, remove the pan of vegetables from the heat and wait until the beans are tender. When the beans are tender, drain them and add them to the pan. Add the corn and torn basil to the pan with about ¼ to 1/3 cup water. Let the succotash simmer gently for about 2 to 3 minutes. Taste and adjust the seasoning, if necessary. Add the tablespoon of butter to the succotash, if using, and stir.
It’s ready.
                                             End of the Summer Soft shells over Succotash

Wednesday, August 19, 2015

Really Deep-Dish Peach Crumb Pie


                                       “Really love your peaches, want to shake your tree…”

It’s our prime peach season right now with the arrival of freestone peaches, which makes making anything with peaches all that much easier. So last week at our local farmer’s market I bought a case of peaches. I might plead insanity if there weren’t others doing the same thing. My plan was to take some to work for dessert specials, give visiting oldest daughter some to take home, and use the rest throughout the week.
This week’s pie night offering will be a deep-dish pie. Really deep, made in a spring form pan with the peaches piled high.
Making the pie in a spring form pan has a few challenges but they’re easy to overcome. The recipes for the crust and the crumb topping are included at the end of the main recipe so you won’t have to track them down elsewhere.

Really Deep-Dish Peach Crumb Pie
You will need a double crust recipe of pie crust dough. There will be extra dough but it’s easier than making too little and running short.
It will help to line the ring of your spring form pan with parchment paper (or aluminum foil). This will make it easier to remove the ring of the pan from the pie when you go to serve it. The crust won’t stick to the sides of the pan and all you will have to do is peel the paper off from around the pie. Parchment works best for this if you have it.
The crumb topping can be made in advance and stored in a food storage bag in the refrigerator or freezer.
This is a big pie. It will take about 1 hour and 20 minutes to bake.

8 cups sliced peaches (This was about 4 ¾ pounds of peaches)
½ cup plus 2 Tablespoon sugar
½ teaspoon ground cinnamon
1/8 teaspoon grated nutmeg
4 Tablespoons cornstarch
Pie Crust (recipe below)
Crumb Topping (recipe below)

1. Halve the peaches and remove the pits. Cut each peach half in half again then peel them. Cut the peaches into ½” pieces and place them into a bowl. Add the sugar, cinnamon and nutmeg and stir. Let stand for 20 to 30 minutes.
2. Prepare the spring form pan. The bottom of a spring form pan has a side that has a small lip at the edge. You do not want that side to be the bottom of your pan. Turn it so that the smooth, flat surface is facing up in the pan. Attach the ring to the pan. Cut strips of parchment paper about 2” wide. To stick the paper to the ring of the pan either spray the ring with food release or use butter. Press the paper in place. You do not need to line the bottom of the pan. Place the prepared pan into the freezer to chill.
3. Roll out your crust to 1/8” thickness, about 13-14” in size. There will be excess dough. Remove the spring form pan from the freezer and carefully fit the dough into the pan; the cold surface of the pan will help the dough stick to the sides as you fit it in place, which will make the job easier. Trim the edges of the dough so that you have about a 2” height all around the pan. Use a fork to lightly prick the bottom and sides of the crust. Return the pan to the freezer.
4. Heat oven to 350 degrees. Remove the spring form pan from the freezer. Place the pan onto a baking sheet. Line the inside of the pan with a sheet of aluminum foil. Fill the foil with pie weights or dried beans or rice, pushing the weights up the sides of the crust. Place the pan into the oven and bake for 15 minutes. Remove that pan after 15 minutes, carefully remove the piece of foil filled with the pie weights then return the empty shell to the oven to bake for an additional 5 minutes. After five minutes, remove the pan from the oven and set aside to cool.
5. Raise the oven temperature to 450 degrees. Mix the cornstarch into the peaches. Spoon the peaches into the pie shell. You will have to mound them slightly higher in the center. Pour most of the remaining juices in the bowl over the peaches. Spread the crumb mixture over the peaches. Place the tray with the pie into the oven and bake for 10 minutes; after 10 minutes, lower the temperature to 350 and continue baking for 1 hour and 15-20   minutes, when the filling is bubbling. Remove the pie from the oven and set aside to cool completely.
To serve, remove the ring from the pan and peel away the parchment paper.
This one’s a big one. Where’s the ice cream?


 Pie Crust Dough
This is a double recipe as needed above
 3 cups all purpose flour
¼ teaspoon salt
1 cup shortening  (or substitute with ½ cup shortening and ½ cup (1 stick) unsalted butter
¾ cup cold water

1. Place the flour and salt into a bowl. Using a fork or a pastry cutter, cut half of the shortening into the flour until it makes small crumbs; cut the remaining shortening into the flour, leaving it in larger sized pieces. Add the water a little at a time and mix until a ball of dough comes together. Remove the dough from the bowl. Pat it flat, wrap it in plastic and refrigerate for at least an hour. This can also be made a day in advance.


Crumb Topping
1 ½ cup all purpose flour
¼ cup + 2 Tablespoons cup sugar
¼ cup + 2 Tablespoons brown sugar (either dark of light)
½ teaspoon salt
1 ½ sticks unsalted butter, cut into small pieces
1. To make the crumb topping, place all of the dry ingredients into the bowl of a stand mixer. Using the paddle attachment, mix the ingredients together. Add the butter and mix until the mixture comes together and forms medium-sized crumbs. Set aside. (Alternately, this can be done by hand using a fork or a pastry blender).
There will be slightly more crumb topping than what you will need for this recipe.


Tuesday, August 4, 2015

Elote!


“You can do anything with local food.” –Corbin Evans

One of the better parts of working in restaurants is the people who cross your path. Very often they move on and you lose track of them but thanks to the Internet, you can find them again.
Corbin Evans is one of those people. Corbin and I worked together in a Philadelphia restaurant years ago. Corbin left to open his own place but closed it due to landlord problems. He moved on, down south, landing in New Orleans. A chef of great talent, his career has experienced highs (recognition from national press) and lows (Hurricane Katrina). After taking a soul -crushing job in institutional cooking to get back on his feet after the hurricane (“Use only these vendors. No local food”), he struck a deal with the owner of the Lyric Theatre in downtown Oxford, Mississippi. Carving out a tiny kitchen from an unused closet (literally) he opened Oxford Canteen, a place where he can cook as he pleases and follow his philosophy of sourcing food locally.
It has worked. Oxford Canteen celebrated its first birthday in March. Corbin is not a person of many words (his own admission) but you can get an idea of the man through his food. The Canteen may be miles away from where you are right now but  if you are ever planning to pass through Oxford, (Ole Miss) you should make it a stop. It’s tucked down an alley but I would imagine anyone you ask would know where it is. You can check out the website below.
Having built up Corbin and his food, this is not his recipe. Sorry. But I feel it’s in his spirit, that of taking good fresh, local ingredients, borrowing an idea from somewhere (in this case, elote, Mexican corn on the cob) and making it into something “new” and delicious.
Elote is Mexican street food: grilled corn on the cob slathered with mayo or crema, ancho chile powder, lime juice, and cotija cheese. For this recipe, the corn is first grilled then cut of the cob. The corn is mixed with greens and some seasonal vegetables then tossed in a dressing made up from flavors you would find in elote. A sprinkle of some cotija cheese finishes the salad. It’s open to possibilities of course. There is no correct way to make this salad. Just don’t skimp on the corn. Plan on one ear person, but why not grill extra corn and have it on hand for when you want to make the salad again later in the week.
If you don’t have a grill you can do what I do. Place the corn, one ear at a time, over a gas flame and rotate until the corn is charred. No grill or gas? I haven’t tried this method but I am certain you could roast the corn-on-the-cob in a 400 degree oven until nicely browned.
The dressing makes a small quantity that can be kept in a container in the refrigerator. It may “break” but a few quick shakes will pull it back together.


Elote Salad
For two servings
Plan one ear per person but while you’re at it, grill several and keep the extra on hand to use later

2 ears corn on the cob
3 Tablespoons lime juice
8 Tablespoons oil (I used3 T. canola oil and 5 Tablespoons extra virgin olive oil)
salt and ground black pepper, to taste
1 teaspoon ancho chile powder (or other chile powder)
pinch of sugar
¼ cup mayonnaise, sour cream, or Mexican crema (or a combination)
2 or 3 Tablespoons crumbled cotija cheese (freshly grated Parmesan will work, too)
salad greens of your choice
cherry tomatoes
sliced radishes
(plus whatever else you’d like to add, such as sliced avocado, toasted pumpkin seeds/ pepitas, etc).


1. Husk the corn and remove the corn silk. Place the corn on a hot grill and cook until evenly charred. Remove the corn from the grill and let cool. To cut the corn off the cob, stand the corn in a medium-sized bowl and cut down the cob, slicing off the kernels. Discard the cobs. Transfer the corn to another bowl, cover, and refrigerate until needed.
To assemble the salad, place two handfuls of mixed greens into a bowl. Add the corn, radishes, and tomatoes (and other ingredients of your choosing) to the bowl. Mix the dressing together if it has separated. Spoon about 2 tablespoons (or so) of the dressing into the bowl and toss to evenly distribute. Add the cheese and mix the cheese into the salad. Divide the salad between two plates and serve.
As Corbin says, “Eat like you mean it.”

Oxford Canteen: http://oxfordcanteen.com/


Tuesday, July 28, 2015

Slow Cooked Zucchini


The other day I saw a recipe for slow cooked green beans and I thought that it could easily be applied  for zucchini. Because it’s that time of summer again--the attack of the killer zucchini. You know the type, the giant, overgrown monsters from your Great Aunt Tessie’s garden. They arrive on your front door steps in the dark of night like orphaned children, your well-meaning friends either overwhelmed by their abundance of summer squash or simply out of ideas of what to do.
But this technique isn’t for those monsters. They’ve grown too large, their seeds too big, the skins too tough. Those often end up stuffed and baked. Or made into zucchini bread. At our local farmer’s market they are everywhere, too, in all sizes spilling out of bushel baskets.  It’s been that kind of year.
I like to select smaller-sized ones, about 5 to 7 inches in length. I combine them with onion, garlic, tomatoes, basil and olive oil and let them cook low and slow. It’s that simple. After about twenty minutes, they yield easily to the point of a knife. A sprinkle of cheese is all you need to finish them. Serve them in a bowl with the cooking liquid along with your favorite protein and dinner is ready.
I have to go. More zucchini just walked in the front door.


Slow Cooked Summer Squash
While Mediterranean in inspiration, you could also season the squash with some chile powder, omit the basil and use chopped cilantro for a recipe that leans a little south-of-the-border.
For two servings
2 medium-sized zucchini or summer squash (about 5 to 7 inches each)
½ cup sliced onion
1 or 2 cloves garlic, sliced
1 medium tomato, chopped (1 cup) or 1 cup canned crushed tomatoes
6 to 8 fresh basil leaves
salt and ground black pepper
olive oil, for cooking
¼ cup water
few tablespoons cheese (I used queso fresco because I had some leftover in the 'fridge. Goat cheese or
             another crumbling cheese or even Parmesan or Romano would work)

1. Wash the zucchini. Cut off the top and bottom ends from the squash. Slice the squash in half, lengthwise, then in half again. Carefully run your knife the length of each piece to remove the softer, seed-bearing part. Set aside.
2. Place a large sauté pan over medium-high heat. When hot, swirl in 2 to 3 tablespoons olive oil. Add the onion and cook until the onion begins to soften, about 2 to 3 minutes; do not brown the onions. Add the garlic and cook until fragrant, about 30 seconds. Add the tomato; season with salt and ground black pepper and stir together. Let tomatoes cook for two to three minutes to soften and begin to give off juice. Lay the zucchini into the pan skin side down. Season the squash with a little salt and pepper. Tear and scatter the basil into the pan. Add the water. Cover the pan and lower the heat. Let the zucchini simmer gently until completely tender, about twenty minutes or so depending on the size of the squash. Before serving, taste and adjust the seasoning if necessary. Scatter the cheese over the squash. Carefully remove the zucchini from the pan and serve with the cooking liquid. 

Tuesday, July 21, 2015

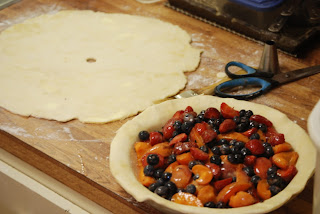
Strawberry, Apricot & Bluebery Pie


Cook with what the farm is giving you.
And after a lazy, cool start in the spring followed by a quick warm up, the choices at our local farmer’s market are staggering. I cannot recall a season when, at one stand alone, you can find strawberries, blueberries, black raspberries, raspberries, apricots, cherries, peaches, and the first plums available at the same time. Which is how I arrived at the combination for this pie. I like the combination of strawberry and apricot (see archives: 6/3/12) and added blueberries.
No complicated thought process there.
For the beginning of pie night this year, I decided to use an all-butter pie crust. I’ve never been a fan. I’ll stick with vegetable shortening for the flakiness; lard is best but people run screaming from the room at the mention of that word. To be honest, when one of my nephews was little the mention of the word “lard” would reduce him to laughter. Some kids laugh at the word “underwear,” his was “lard.” And “blender.”
All-butter pie crusts usually include a little vinegar. You don’t taste the vinegar; it helps with the flaky quality of the finished crust.
None of this is complicated unless you have to work around a dog, a very big golden retriever who feels his presence will assure great results, even if it means he plants himself underfoot. Welcome to our life.

Strawberry, Apricot, and Blueberry Pie   

1 pint strawberries (2 cups)
1 pint apricots (2 cups)
1 pint blueberries (2 cups)
½ cup sugar
5 Tablespoons cornstarch
1 egg beaten with 1 teaspoon water

Pie Crust
For one 9” double crust pie
The crust can be mixed by hand, or using a pastry blender, in a mixer fitted with the paddle attachment, or in a food processor. If you use a food processor, take care not to over mix the dough.
If you want to skip the butter, use an equivalent amount of vegetable shortening and omit the vinegar. Or use half butter and half shortening. Whichever you prefer.

3 cups all-purpose flour
1 teaspoon salt
2 sticks (8 ounces) unsalted butter, cut into ½” pieces, chilled
1 teaspoon cider vinegar
1 cup cold water (you won’t need all of it)

1. Place the flour and the salt into a bowl and mix to combine. Add half of the cold butter and mix until the butter forms a sandy texture with the flour. Add the rest of the butter to the bowl and continue mixing, leaving bigger pieces of butter in the flour.
2. Pour the vinegar into a measuring cup. Add enough water to make ¾ cup liquid. Add the water to the dough in small amounts mixing until the dough comes together and forms a ball. If the dough appears too dry, add a little additional water. Remove the dough from the bowl and divide in half. Shape each piece of dough into a flat disk. Wrap and refrigerate the dough for at least 20 to 30 minutes or overnight.
3. Rinse the strawberries under cold water. Remove the stems and cut the berries in half lengthwise. If the berries are large, you might have to cut them into quarters. Place the strawberries into a bowl. Wash the apricots. Run a knife around the apricot, cutting down from the top. Separate the halves and remove the pits. Quarter the apricots and place them into the bowl. Rinse the blueberries under cold water. Pick out any stems, if necessary, then place them into the bowl with the other fruit. Add the sugar and mix together. Set aside for 20 minutes.
4. Roll out the bottom crust. Remove one dough disk from the refrigerator. Place the dough on a lightly floured surface and roll the dough out away from you in one direction. Give the dough quarter turns in a circle and continue rolling out the dough dusting with additional flour as needed until the dough is 1/8” thick. Lift and place the dough into a 9” pie plate. Trim the excess dough from the edge, leaving about a ½” overhang. Place into the refrigerator.
5. Heat oven to 450 degrees. After the fruit has given off some of its juices, mix in the cornstarch until evenly blended. Set aside.
6. Roll out the top crust. Cut a circle into the center of the dough. Remove the bottom crust from the refrigerator. Place the fruit into an even layer in the pie pan. Brush the edge of the bottom crust with some of the egg wash. Lay the top crust over the fruit, pressing the edges together. Trim away excess dough. Press the edges of the crust to thin them out and turn them under onto the rim of the pie plate. Crimp the edges together around the outside of the crust. Brush the top of the crust with some of the egg wash; sprinkle the top crust with some sugar if you wish.
7. Place the pie onto a baking tray and then into the oven. Bake at 450 degrees for 10 minutes; after ten minutes reduce the heat to 350 degrees and continue baking for an additional 40 to 45 minutes until the filling is bubbling. Remove from the oven. Resist all temptation to eat it until it cools completely. Serve alone, but c’mon, really? Break out the ice cream!


Wednesday, July 1, 2015

Shrimp with Tasso


Regionalism is shrinking. Once if you wanted a certain “regional” food, such as the many permutations of barbecue (Memphis. St. Louis, Texas, North Carolina, etc), or lobster rolls or even Buffalo wings, you had to travel to get it.
But now distances have been shortened.  Northerners now try their hand at being pit masters. Buffalo wings, or some sorry version, are everywhere. You can order Corky’s barbecue off of the TV.
There are advantages and disadvantages to this of course. But if it makes a great ingredient more easily obtainable, I’m there.
Tasso is spiced, smoked pork shoulder used in Southern Louisiana, Cajun/Creole in origin.
I have been lucky to find locally made tasso at our local farmer's market supplied by Freeland Market.
Freeland Market is a family-run business in Pottstown. They make a large variety of sausages and they also make a great version of  tasso. 
The uses of tasso are pretty limitless; think of where you might use bacon and tasso makes for a spicy, smoky alternative. Just slice off what you need and rewrap it. I keep it in the freezer and take it out as I need it.
This recipe for shrimp sautéed with tasso is very NOLA in origin. While shrimp broth is called for in the recipe, you can skip that and substitute with a little beer instead. I wouldn’t use a beer with too complex a flavor for it might get in the way, but I wouldn’t use some type of “light” beer either. The shrimp broth is easy to put together using the shells of the shrimp in the recipe. Peel the shrimp and make the stock while you do the rest of the prep. The stock should be ready when you are ready to cook. Shrimp stock, like most seafood stocks, cooks for only 20 minute or so. There’s always the option of using chicken broth, too. The recipe for shrimp stock follows at the end.
Serve the shrimp with some rice, cold beer, and you are all set. As the late, red suspendered Cajun chef Justin (“Joo-stan”) Wilson used to say, “It’s wondermus, I ghar-un-tee.”

Shrimp with Tasso
For two servings

½ to ¾ pound shrimp
½ cup diced tasso
2 or 3 spring onions (scallions), chopped (about ½ cup)
½ cup diced red bell pepper
1 rib celery, diced
2 or 3 cloves minced garlic
1 cup chopped (canned) plum tomatoes, along with some of their juice
shrimp stock (recipe below)
1 to 2 Tablespoons chopped Italian parsley
1 Tablespoon unsalted butter, optional
salt and ground black pepper
olive oil, for cooking

1. Peel and devein the shrimp; reserve the shells for stock. Place a large sauté pan over medium-high heat. Season the shrimp with salt and pepper. When the pan is hot, swirl in one to two tablespoons olive oil into the pan. Add the shrimp; you don’t want to cook the shrimp entirely at this point. Sear them off on one side, turn them and sear them on the other side, then transfer them to a plate.
2. Let the pan cool slightly then add the tasso, adding additional oil to the pan if necessary. Stir and let the tasso cook for 2 to 3 minutes. Add the onions, bell pepper and celery, and continue cooking. Scrape the bottom of the sauté pan as the vegetables cook to loosen any “browned bits” that might have developed. Saute the vegetables until they begin to soften, about 4 to 5 minutes. Add the garlic and cook until fragrant, about 30 seconds. Add the chopped tomatoes and some of their juice; season with salt and black pepper. Ladle in about ½ cup shrimp stock (or some beer or chicken broth) to the pan and simmer for 3 to 4 minutes. Return the shrimp to the pan to finish cooking the shrimp. Taste and add salt and pepper, if needed; stir in the parsley, the butter (if using) and remove the pan from the heat. Divide the rice between two bowls and divide the shrimp, tasso, vegetables, and sauce. Serve with cold beer.

Shrimp Stock
Reserved shrimp shells
3 cups cold water
½ teaspoon salt
½ onion, chopped
1 carrot, chopped
1 rib celery, chopped
1. Place the shrimp shells and vegetables into a saucepot; add the water and salt. Place the pot over high heat and bring to a boil. Reduce heat to a simmer and cook the stock for twenty minutes. Remove from heat. Strain the stock through a colander or strainer, reserving the liquid. Discard the shells and vegetables.


There is also a recipe for corn and tasso “hash” in the archives 7/8/12

Wednesday, June 17, 2015

Seasonal Beet Salads


Beets. The line is clearly marked. It's either "yes" or "no". There is no "maybe" with beets.
I am the only person at this web address who will eat beets. If you don't like beets, don't run away just yet. This same idea could be used substituting roasted carrots for the beets (see archives: 9/24/14). What follows is less a recipe but more of a way to approach beet salads throughout the season.
Stick with me, you will understand.
Most beet salads you find in restaurants combine the beets with cheese, usually goat or blue cheese since it complements and off-sets the sweetness of the beets, along with some greens, and nuts.  Recently while out with youngest daughter I had a beet salad composed in this manner but the result was cloyingly sweet, using a balsamic vinegar glaze and candied nuts. Sweet upon sweet upon sweet. It was sweeter than some desserts.
So dodging the incredulous looks of my family members, I have been making roasted beet salads. I added some strawberries since they were also in season. I crumbled some blue cheese (gorgonzola dolce) onto the plate, added a few toasted walnuts and some locally grown pea shoots. As the season changes, the strawberries can be replaced with another seasonal berry. You can change the cheese (Birchrun Farms blue? A nice local goat cheese? What about cheddar or a jalapeno jack cheese?), the nuts (hazelnuts? pecans?), and the greens.
You get the idea. Own it.


Instead of boiling, roasting has become the preferred cooking method for beets. Cooking times will wary depending on the size of the beets.
To roast beets:
Heat oven to 400 degrees. Rinse the beets, trim the root ends and cut off the beet greens, if attached. (The beet greens can be sauteed as a replacement for spinach or another green.) Place the beets on a sheet of aluminum foil. Drizzle the beets with olive oil, season with salt and black pepper. You could also add a few springs of fresh thyme, too. Wrap the beets, place the beets onto a baking tray and roast the beets for about 45 minutes to one hour, depending on the size of the beets. The beets are done when they are easily pierced with the point of a knife. Remove from the oven. When the beets are cool enough to handle, peel off the skins (red beets can stain so you might choose to wear a pair of disposable food prep gloves), discard the skins, and store the beets in a covered container in the refrigerator until needed.

Before serving, dice the beets and toss them in a white balsamic vinaigrette (Follow the basic ratio of 1 tablespoon white balsamic vinegar mixed with 2 or 3 tablespoons extra virgin olive oil; season with salt, ground black pepper, and a bit of sugar. Mix well and store until needed.)


Wednesday, June 10, 2015

Pan Roasted Wild Salmon with Roasted Carrots and Carrot Risotto


We’ve been eating a lot of carrots recently, usually roasted and tossed together in a salad. The salad is a variation of a roasted carrot salad from last summer that you can find in the archives (9/24/14).
But with some leftover carrots hanging around I decided to roast them and serve them with some wild Sockeye salmon and a carrot risotto using carrot juice instead of a vegetable or chicken stock. Most stores have fresh carrot juice on hand.
Vegetarians can just make the risotto, chopping and folding the carrots into the risotto at the end.
You don’t even have to use salmon. It would work perfectly well with chicken or pork tenderloin.
For the carrots, I have found bunches of smaller-sized organic carrots (with tops attached) which work perfectly while we wait for locally grown carrots to appear at the farmer’s market. Use any carrot as long as they are cut to a uniform thickness to assure even cooking. I season the carrots with some ground coriander seed, which has a bright, lemony flavor. Ground cumin seed would work too.
The risotto technique may seem radical but it works perfectly and it cuts down on stirring. You still need to stir the rice occasionally to prevent the rice from sticking to the bottom of the pan as well as to look to make sure the risotto is cooking at a gentle simmer. But in terms of standard risotto technique this is fairly low maintenance.
To strategize your cooking, roast the carrots first and set them aside. Prepare the risotto and set it aside unfinished. Cook the salmon. While the salmon is cooking, finish the risotto as directed. Warm the carrots in the oven when the salmon goes into the oven.
This makes for a very orange plate. Hail beta-carotene.

Pan Roasted Wild Salmon with Roasted Carrots and Carrot Risotto
For two servings

Two 4 to 6 ounce portions of salmon
Salt and ground black pepper
Extra virgin olive oil
Juice of ½ lemon

Roasted Carrots
1 bunch of carrots (about 8 to 10 small-sized carrots or 4 or 5 regular-sized carrots.)
1 teaspoon sugar
1 teaspoon ground coriander seeds
salt and ground black pepper
2 to 3 Tablespoons extra virgin olive oil
1. Heat oven to 400 degrees. Clean the carrots under cold water and scrub them with a soft bristled brush; they don’t need to be peeled. If they have tops, remove tem and trim the bottom of the carrots. Slice the carrots in half lengthwise. If you are using larger carrots, halve them lengthwise. You might have to cut the carrot in half, crosswise.  If the top half of the carrot is thicker than the bottom half, slice the thicker part into quarters. You want to have 16 to 20 pieces of carrot when you are finished.
2. Place the carrots into a bowl. Drizzle them with olive oil and season with the ground coriander, sugar, salt, and ground black pepper. Toss the carrots together to distribute the seasonings. Lay the carrots in an even layer on a foil-lined baking tray. Place the carrots into the oven and roast for 16 minutes. Remove the carrots from the oven and carefully turn them over and return the carrots to the oven to roast for an additional 6- 8 minutes until the carrots are tender; a knife point should easily pierce the carrots. Using the aluminum foil on the tray, wrap the carrots and set aside.

Carrot Risotto
Usually white wine is the first liquid added to a risotto before the addition of stock. I omitted that step for this recipe. You could certainly use white wine. Just alter the first addition of liquid to be read “1/4 cup white wine, followed by ¾ cup carrot juice.” The white wine isn’t really necessary in this risotto. Since this technique will work for any risotto, you might find yourself wishing to include the wine when making a different risotto.
If you have a timer handy, it will help with monitoring the cooking time.

For 2 servings
½ cup Arborio rice
1 Tablespoon minced shallot
1 to 2 Tablespoons olive oil
2 cups carrot juice
2 to 3 Tablespoons grated Parmesan cheese
1 Tablespoon unsalted butter
1 to 2 teaspoons minced chives
1. Place the carrot juice into a saucepan and warm it over medium high heat.  Place a second pan over medium-high heat. Swirl in the olive oil; add the shallots and sauté the shallots to soften, about a minute. Add the rice and stir the rice into the shallots and oil. Add 1 cup of the hot carrot juice to the rice and stir together. Season with some salt then cover the pot and lower the heat. The rice should simmer throughout cooking. Occasionally stir the rice to prevent it from sticking, looking to see that the risotto is cooking gently. Cook for 10 to 12 minutes until almost all of the carrot juice has been absorbed. (At this point the risotto can be put aside and finished later).
2. Taste the rice for tenderness: If there are any “crunchy bits” in the center of the rice, it needs to cook longer. To finish the risotto, place the pot over medium-high heat. Add more carrot juice, stir and continue cooking until the rice is cooked through but is still has a toothsome bite to it. When the rice is al dente, taste for seasoning, adding additional salt if needed, some ground black pepper, the cheese, and butter plus the chives.  You can add some more stock depending on whether you like your risotto creamy or “tight.” Stir everything together. Turn off the heat, cover and let the risotto stand for about 2 minutes before serving.

Pan Roasted Wild Salmon
1. Heat oven to 375 degrees. Season the salmon with some salt and ground black pepper. Heat a non-stick sauté pan over high heat. When hot, swirl in a little olive oil. Carefully place the salmon into the pan, skin side up. Cook the salmon for about 3 to 4 minutes, depending on the thickness of the fish (a 1” thick fillet will take about 10 minutes total cooking time for well done, so adjust the cooking time to the thickness of your fish and your preferred degree of doneness). Turn the salmon and place it into the oven to finish cooking, about 3 to 4 minutes). Carefully remove the pan from the oven. Remove the salmon from the pan and place it skin-side up onto a paper towel lined plate. If the skin is on the fish and you wish to remove it, it will easily peel off the fillet.
To serve, divide the risotto between two plates. Top the risotto with some roasted carrots, then the salmon and the last of the carrots. Gloss the salmon with a drizzle of extra virgin olive oil and a squeeze of lemon juice.


Tuesday, June 2, 2015

Burrata with Morels


                                                                      (No. It's burrata...)


With the opening of our local farmer’s market, spring has truly arrived. While it’s early in our growing season, there’s asparagus, plenty of greens, rhubarb, and the long awaited strawberries (fantastic so far this year) and wild mushrooms.
I paired sautéed morels with lightly warmed burrata cheese. Before you think this is a recipe for something you cannot get, remember that this is a template and you can use any mushrooms. The earthy flavor of the warm mushrooms paired with the lushness of burrata make for a great first course (or small plate, in restaurant speak).
Burrata is the mad genius-fever dream of some cheese maker who thought (and I translate freely from Italian), “How can I make mozzarella even better? I know. I’ll fill it with leftover scraps of mozzarella and some cream.” Genius. But more to the point it was no doubt a case of not wanting to waste anything which is so often the inspiration behind great food and cooking.
Burrata is easier to find nowadays thanks in part to the explosion in our love for all things lactic and the ever- expanding cheese selections in stores. The brand I found had two burrata per container and that meant two servings over two different days making it a little less expensive.
My apologies to the lactose intolerant (sorry, sweetie) but this is delicious. And easy.


Burrata with Morels
1 ball burrata cheese
4 ounces morels (or any other mushroom)
1 Tablespoon minced shallot
1 clove garlic, minced
1 Tablespoon unsalted butter
1 Tablespoon extra virgin olive oil
salt and ground black pepper
Baguette slices, brushed with olive oil and toasted
1. Heat oven to 250 degrees. Place the burrata into an oven-proof shallow dish and cut the burrata in the middle so the burrata opens. Season the burrata lightly with salt. Set aside.
2. Trim the bottoms off the mushrooms. Rinse them under cold water and slice the mushrooms in half lengthwise, depending on their size (this, of course, will vary depending on the mushrooms you use).
Place a medium-sized sauté pan over medium-high heat. When the pan is hot add the butter and olive oil. After the butter has melted, add the shallots and sauté for a minute or two until the shallots have softened. Add the garlic and cook until the garlic is fragrant, about 30 seconds. Add the mushrooms to the pan, season with some salt and ground black pepper and cook the mushrooms until they are tender, about 5 minutes.
3. While the mushrooms are cooking, place the burrata into the oven to warm for a few minutes; watch so that the burrata doesn’t collapse (if it does, it will still be alright).
4. To serve, remove the burrata from the oven and spoon the cooked mushrooms and their liquid over the cheese. Add a little extra olive oil to the pan to rinse out any remaining shallots or garlic and pour this over the cheese; season with some additional ground black pepper. Serve the burrata/ mushroom mixture with the toasted baguette slices along with a knife and spoon. Make sure that nothing is left behind before calling it quits. Fondue never had it this good.

If you know me at all, there was no choice but to resort to the “Day the Earth Stood Still.” 


Wednesday, May 20, 2015

When life give you pears...you make soup:Cauliflower-Pear Soup


Friends are away in Ireland and we’re in charge of their cat. On our first visit we found a note in the kitchen: “There are pears and celery in the refrigerator to take home.”
It immediately reminded me of when my mother would leave for vacation and present us with the few perishables left in her ‘fridge: the remaining milk, bits of this and the last of that (a strip of red bell pepper? Really?).
Alas, we are not fans of pears. There was one particular night of dining that involved an intermezzo of pear sorbet presented to us on little cones. Sorbet courses were big back then. “Palate cleansers” they were called but this sorbet was anything but palate cleansing. It was gritty and way too sweet. Not to mention the embarrassment of sitting in a white linen environment nibbling on little cones of sorbet. It was a culinary misstep at the midpoint of a meal that had yet to reach its disastrous zenith.
I figured I would use the celery and pears in soup. And with the mercurial nature of spring-it’s hot one day, cooler then next-I wanted a soup that could be served either cold or hot. It’s a riff on the classic leek and potato soup with the pears lending a sweet touch.
Since this is soup, measurements don’t need to be precise. I list amounts as the guideline of what I used. But do make sure the pears ripe. How do I tell if a pear is ripe? A ripe pear will give when pressed at the top near the stem. Peel the pears and slice them in half lengthwise. Remove the core and the fibrous bit that runs from the stem to the core. Cut the pears into pieces.
Leeks tend to be sandy so they will need to be rinsed. Trim off the bottom of the leek. Cut away the greenest parts of the leaves at the upper end of the leek. Any trimmings can be frozen for stock. Cut the leek in half lengthwise then slice the leek crosswise, using the white and pale green parts of the leek. Rinse the slices under cold water to loosen and remove any sand.

Cauliflower-Pear Soup
4 cups sliced/chopped cauliflower
2 leeks, cleaned and sliced (3 cups)
2 stalks celery, sliced (1 cup)
2 pears, peeled, cored, and chopped
salt and ground black pepper
1 to 2 Tablespoons olive oil
1 Tablespoon unsalted butter
6 cups cold water
½ cup light cream (optional)

1. Place a large (2 quart) sauce pot onto the stove over medium heat. When hot, swirl in the olive oil and the butter. When the butter has melted, add the leeks and celery to the pot and stir together; season with a little salt. Cover and lower the heat and let the leeks and celery begin to soften, about five minutes.
2. Add the cauliflower and pears to the pot. Pour in the water and season with a teaspoon of salt. Cover the pot and raise the heat. When the soup comes up to a boil, reduce the heat to a simmer. Cook until the cauliflower is tender, about 20 minutes. Remove from heat and let cool before pureeing the soup using either a blender (puree the soup in batches) or with an immersion blender until smooth. Add the light cream and taste for seasoning (it will need salt), adding some ground black pepper (if you are a purist, use ground white pepper). Serve the soup either chilled on a warm day or hot on a cool day.  We’ll leave some of this in our friends’ freezer for when they return home.

Wednesday, May 13, 2015

Chorizo Tacos with Radish Slaw


Listening: Miles Davis Quintet: "Live at the 1963 Monterey Jazz Festival"


Consider the radish.  I doubt that you have ever been asked that before and I can understand. It’s just a
radish, the stubby red root relegated to adding crunch and heat to a salad or a crudite plate. It’s usually playing a supporting role and not much more. Not too exciting. No one has ever said, "Hey, I've got this new recipe for radishes!"
We’re most familiar with the chubby, round red variety. But if you are a dedicated radish grower, and I assume there are plenty out there judging from all of the seed catalog offering, you might be familiar with other varieties such as round or icicle shaped white radishes, or the Japanese daikon, or black Spanish radishes (black on the outside, white on the inside), or Chinese varieties in green, rosy pink or those that have a purple center. There’s even a Munich beer radish.
Then there is the current favorite among chefs, the French breakfast radish, a milder, slender and elongated variety often found among the offerings at a farmer’s market. They’re treated like an exotic specimen, much like the French exchange student that steals your attention away from the high school girls you see every day who you suddenly find lack a certain je ne sais quoi, shall I say?  Plus you shouldn't eat a French breakfast radish in the way you would eat an ordinary radish. It should be served spread with butter and a sprinkling of sea salt. It’s French, after all.

Lately I have been seeing radishes creep into Mexican food, as a garnish of course but still, there they are. And it does make sense since radishes impart a spicy kick similar to the hot chiles in a salsa. (And now for the science!)  The “bite” comes when you chew and combine a chemical compound in radishes (glucosinolate) with an enzyme (myrosinase) and form a “new” compound, allyl isothiocyanate, which is mustard oil. (The mouth as chemical reactor!)
This is also the way that horseradish and wasabi get their pungency.
For this recipe I dispensed with the usual uninspiring shredded lettuce that often finds its way into tacos and replaced it with a cabbage slaw studded with radishes.
This is quick and easy. While this is written for serving two people, the recipe can be increased to feed whatever sized crowd you have on hand. While I added crumbled goat cheese and avocado, you can shape this to how you like your tacos. The slaw would be great with fish tacos.

Radish Slaw
Add the radishes to the slaw right before serving. If they sit in the dressing too long, they will lose their sharpness. You want the bite.
¼ head small green cabbage, thinly sliced (about 2 cups)
1 cup thinly sliced radishes (halve the radishes first, then slice)
½ jalapeno, seeds removed and sliced
juice of one lime
1 teaspoon salt
½  teaspoon ground black pepper
1 teaspoon sugar
1. Place the cabbage and jalapenos into a bowl. Add the lime juice, salt, ground black pepper, and sugar. Mix well to combine. Cover the bowl and set aside for at least 30 minutes. Right before you are ready to serve the slaw, mix in the radishes.

Chorizo Taco Filling
½ pound (or so)* chorizo sausage (raw, Mexican-style sausage)
½ cup  chopped onion
Olive oil, for cooking
1. Remove the chorizo sausage from the casings. Place a medium-sized sauté pan over medium-high heat. Swirl  two tablespoons of olive oil into the pan. Add the chorizo to the pan and break it up into pieces. When the chorizo appears to be cooked half way, add the onions, stir, and continue cooking until the chorizo is completely cooked. Taste the chorizo; if the chorizo isn’t as spicy as you like, add some dried chili flakes. Set aside and keep warm.
To assemble:
Corn tortillas
1 cup crumbled goat cheese
one ripe avocado, sliced
1. Warm the corn tortillas in a dry, hot sauté pan or wrapped in foil in a low oven.
Layer the warm chorizo mixture onto a tortilla. Add the crumbled goat cheese and an avocado slice or two. Top with the slaw. Repeat. And repeat again. You get the idea. Get out the napkins and open a cold one.

*I used three sausages, which was a little over 9 ounces. Sausage rarely comes in the exact mount you want.

Radish photos from W. Atlee Burpee & Co.

Wednesday, May 6, 2015

Split Pea Soup-At Home in the Spring


Most people, at least those of us here on the East Coast, would associate split pea soup with winter but  I am making this on a warm spring day. Split pea soup is usually made with a smoked ham hock with the hock contributing its smoky flavor to the soup as it cooks. When the peas are soft, you remove the ham, remove the meat from the bone, shred it, and return it to the soup. I had some leftover ham to use up so I omitted the ham hock, adding the diced ham at the end of cooking. Preparing it without the ham hock makes a case for making a vegetarian version of the soup. If you miss the smoky flavor, you could add some mild Spanish smoked paprika (pimenton).
There are green and yellow varieties of split peas. Use whichever you like. I was raised on the green variety. Split peas are high in protein and fiber. Perhaps that’s why General Sir Arthur William Currie decided that pea soup was the perfect food to feed his French-Canadian troops during World War I, resulting in the French-Canadians being called “pea soups” by the English soldiers. The nickname still prevails. Pea soup runs deep with the Quebecois. (And that's this week's CanCon, accomplished without having to resort to Rush or Gordon Lightfoot).

Split Pea Soup, with or without (the ham, that is)
1 cup chopped onion
1 cup diced carrot
2 ribs celery, diced
1 ½ cups split peas
6 cups water
olive oil, for cooking
1 small smoked ham hock
salt and ground black pepper

1. Place a 3 quart sauce pot (or similar) onto the stove over medium-high heat. When hot, swirl two tablespoons olive oil into the pan. Add the onion, carrots, and celery and stir. Season the vegetables with some salt. Cook the vegetables for 4 to 5 minutes to begin softening the onions; lower the heat if necessary.
2. Pick over the split peas to look for any stray bits then rinse the peas under cold water in a colander. Add the split peas to the pot and stir them into the vegetables. Add the cold water and the ham hock (if using). Bring to a boil and then reduce the heat to a simmer and cover. Cook the split peas for 30 to 40 minutes until they have softened. If you are using a ham hock, remove it from the soup and let it cool before shredding the meat away from the bone. At this point if you have an immersion blender you could puree the soup, either a little or almost completely, depending on your preference. Return the ham to the soup. Taste for seasonings; add salt and ground black pepper to taste. If the soup is too thick, it can easily be thinned with some additional water. And a little hot sauce is a good option, too.
I know this soup is right at home on a winter’s night, but it’s perfect on an spring evening. 

Monday, April 20, 2015

Rhubarb-Orange Cream Tart


                                           “You can never hold back spring.
                                        Remember everything spring can bring.
                                          Baby, you can never hold back spring.”*
                         
                               
It’s time to begin year three of “Pie Night," our weekly evening of pie with friends. And we begin with rhubarb, one of the early signs of spring although in complete honesty it hasn’t pushed its way up toward the sun around here just yet.
For this year, it’s a tart filled with an orange pastry cream, topped with rhubarb and a simple crumb mixture. I know it might appear to be a lot of steps, but relax.  The different “components” of the tart can be made over a couple of days and assembled when needed. Each step will take a small amount of time and then they will all be ready when you are.
Since it’s a new season I included the sablee crust recipe below so you don’t have to go digging through the archives for the recipe. And if you panic at the thought of making a crust, this is easy to make. It’s essentially a cookie dough and it’s very forgiving. Any mistakes can be easily repaired. It’s not the prima donna that some find the standard flour-shortening-water pie crusts to be. The sablee dough needs be made at least a day in advance and allowed to chill in the refrigerator. It can hold for well over a week, longer if frozen. The pate sablee can be made by hand, mixing it together in a bowl the way you would make a cookie dough or with an electric stand mixer fitted with the paddle attachment.
The pastry cream filling should be made at least a day in advance. Pastry cream is usually thickened with flour or cornstarch (I prefer the texture of cornstarch) but lately I have been playing with rice flour and use it for the pastry cream. If rice flour isn’t available to you, you can substitute with cornstarch.
The crumb topping can be made in a mixer or by hand. You can make it ahead of time and store it in a plastic bag in the refrigerator.

Rhubarb- Orange Cream Tart
For one 10” tart
1 pound rhubarb stalks, sliced into ½” wide pieces (about 4 cups sliced rhubarb)
½ cup sugar
2 Tablespoons cornstarch

Orange Pastry Cream
1 Grade A large egg
1 egg yolk (from a Grade A Large egg)
¼ cup sugar
1 ½ Tablespoons rice flour (or cornstarch)
pinch salt
1Tablespoon grated orange zest
1 cups milk or half & half
1 to 2 Tablespoons unsalted butter

1. In a medium-sized bowl, whisk the egg and yolk together. Whisk in the sugar and then add the rice flour (or cornstarch) and salt, mixing until smooth. Set aside.
2. Place the milk/ half & half and butter into a stainless saucepan. Place the pan onto the stove over medium-high heat until the butter has melted and the milk is hot. Remove the pan from the heat and whisk some of the hot milk into the egg mixture (This is known as "tempering" the eggs). Pour the egg mixture back into the pan, whisking it together with the milk in the pan. Place the pan back over medium-high heat and whisk until the mixture comes to a boil and thickens. Remove pan from the heat. Transfer the pastry cream to a bowl or a container. Cover the top pastry cream with a piece of plastic wrap, pressing it directly onto the pastry cream. Let the pastry cream cool then place it into the refrigerator to cool completely.

Pate Sablee
¼ pound (1 stick) unsalted butter, at room temperature
½ cup confectioner’s sugar
1 Grade A large egg yolk
1 1/3 cups plain cake flour
¼ teaspoon salt
¼ teaspoon baking powder

1. Place the butter into a medium-sized bowl and beat until smooth. Add the sugar and blend until fluffy.  Mix in the egg yolk and then add the flour, salt, and baking powder. Mix until all of the ingredients are combined. Remove dough from the bowl. Wrap in plastic wrap and refrigerate until needed.

Crumb Topping
1 cup all purpose flour
¼ cup sugar
¼ cup dark brown sugar
pinch salt
½ teaspoon cinnamon
½ teaspoon ground (dry) ginger
1 stick (4 ounces) unsalted butter, at room temperature
1. Place all of the dry ingredients into a bowl. Cut the butter into small pieces. Add the butter to the bowl and mix together until small crumbs form. This can either be done in a stand mixer fitted with the paddle attachment or by hand using a pastry blender or mixing it with your impeccably clean hands. Set aside completed crumb mixture or store it in a sealable plastic bag in the refrigerator until needed.

Assembling the Tart
1. Heat oven to 350 degrees.
2. When you are ready to roll the dough remove it from the refrigerator for 10 minutes to allow it to begin to soften. While you are waiting for the dough to soften, rinse the rhubarb under cold water. Slice the rhubarb crosswise into ½” pieces. You should have about 4 cups sliced rhubarb. Place the sliced rhubarb into a bowl. Add ½ cup sugar and mix together. Set the rhubarb aside.
3. Working on a floured surface, cut the dough into pieces and knead until the dough is smooth. Roll
the dough out to 1/8th” thickness; for a 10” tart, the dough should be  about 12” in diameter. Use extra flour to prevent the dough from sticking as you are working. Fit the dough into the tart pan. Lift and place the dough into the pan; don’t stretch it into place. Remove any excess dough by cutting it off of the edge of the pan. Save any scraps if you need to make any repairs. Just press pieces of the soft dough into the crust if necessary. Using a fork, lightly prick the crust on the bottom and sides. Refrigerate before baking.
3. To bake the crust, line the dough with a piece of aluminum foil. Fill the foil with rice, dried beans, or pie weights. Place the tart shell onto a baking tray and bake the tart shell for 15 minutes. Remove the pan from the oven. Carefully remove the foil with the rice/beans or pie weights. Return the empty tart shell to the oven and bake for 5 additional minutes. Remove and let cool. Any rice or dried beans used to line the foil can be saved and reused.
4. Raise oven temperature to 375 degrees. Remove pastry cream from refrigerator and stir with a spoon until smooth. Spread the pastry cream in an even layer in the tart shell. Mix the rhubarb with 2 Tablespoons cornstarch. Spoon the rhubarb and half of the juices in an even layer on top of the pastry cream. Cover the rhubarb with the crumb mixture; there will be some crumb topping left over.
5. Place the tray with the tart into the oven and bake for 10 minutes. After 10 minutes, lower the temperature to 350 degrees and continue baking for an additional 45 to 55  minutes, when the rhubarb is bubbling. Remove from oven and let cool.
Serve with some whipped cream. Spring is here.

*"You Can Never Hold Back Spring" by Tom Waits

If you'd like directions for a plain rhubarb crumb pie, that's available in the archives, May 4, 2012. My first post.